Home > Install Guide >Installation Guide for Convertible Top Weatherstrips
Home > Install Guide >Installation
Guide for Convertible Top Weatherstrips
Installation Guide for Convertible Top Weatherstrips
| See Also: |
||
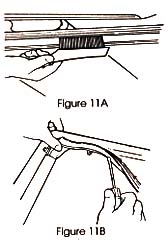
READ CAREFULLY BEFORE YOU BEGIN INSTALLING CONVERTIBLE TOP WEATHERSTRIP! GENERAL HINTS: Proper fit and function of this molded roof rail seal depends upon the correct adjustment of the top frame, relative to the side windows. Do not expect the weatherseal to automatically fit every car without some adjustments. A) PREPARATION: Raise the top to a good working height. Remove all old pieces of weatherstripping from the roof rails and header. Scrape out and clean all foreign material from the roof rail frame (Figure 11A) using a wire brush and an adhesive release agent if necessary. You may need to raise and lower the top to have access to all screws and anchor pins. |
B) ADJUSTMENTS: Adjust door and side windows, so that there is an even gap of about 1/2" along the top edge of the glass to the back roof rail.
C) INSTALL ROOF RAIL SEAL: Install the driver side and passenger side long straight pieces first, then the corner pieces, up to the header. D) INSTALL HEADER SEAL (Figure 11B): Cut the sponge rubber seal with a sharp knife to proper length (if molded ends are not connected to side rails). Use an adhesive to bond it to the header. Trim the ends neatly to fit flush with corner pieces. Some front sections on certain cars are pre-bonded to the header. In those cases you should skip this last step. |
E) FURTHER ADJUSTMENTS: Note that the molded holes in the side rail pieces are somewhat oversized. Position the front side rail pieces laterally, so the door glass top edge enters the groove in the weatherstrip. Note: Angle of the trim on all side glass may be adjusted by inside-the-body adjustments. Please consult your vehicle manual for details if needed. F) RECOMMENDATION: We suggest that silicone-based or water-based spray lubricant be used on all rubber pieces where glass meets rubber to prevent excess friction. G) TO FINISH: Position the remaining side rail pieces as described in step E. Close the top before any adhesive dries, being careful that no adhesive drips out. |